

The Schedule App feature lets you automate when your app workflows run, so you don’t need to manually trigger them every time. Whether it’s a daily report, a weekly reminder, or a yearly task, scheduling saves time and keeps your processes running smoothly.
How to Schedule an App
From the App View page, enter all of the input values you want the app to use.
Click the dropdown arrow next to the Submit button.
Select either a default schedule option (such as Daily or Weekly) or choose Custom time.
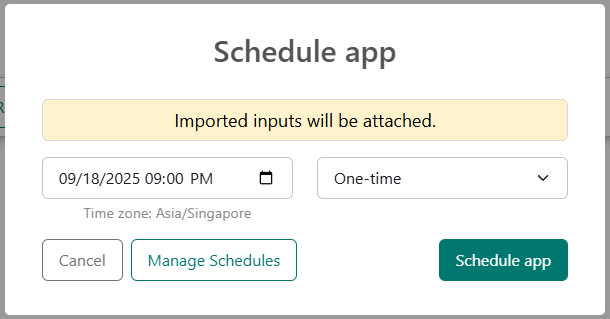
In the Schedule app modal, set your schedule details:
Date and Time: when the app should run.
Frequency: one-time, daily, weekly, monthly, or yearly.
Click Schedule app in the modal to save your schedule.
ℹ️ Note: The input values you set before scheduling will be used each time the app runs. If you need to change them, you’ll need to create a new schedule.
Trigger App Runs with Events
In addition to scheduling apps by time, you can also run workflows automatically when events happen in your connected tools. This is called an Event Trigger.
Setting Up an Event Trigger
From the App View page, click the dropdown arrow next to the Submit button.
Select Event Trigger.
In the Schedule App modal, choose:
The Tool you want to connect (e.g., Gmail, Slack).
The Event that should trigger the app workflow (e.g., new email received).
Save your event-based schedule.
🔑 Note: Event triggers rely on connected tools. If you don’t see this option, you may not have tool connections enabled. In that case, please reach out to your administrator.
Mapping Events to Workflow Inputs
If your app workflow requires inputs, you’ll need to map event data to those inputs:
After creating the event-based schedule, trigger the selected event once so PromptForm can capture its data (payload).
Example: If the trigger is “New Email (Gmail)”, receive an email in the connected Gmail account to generate event data.
Go to the App Schedules page and click Map Events to Inputs.
Map event fields (like “email subject” or “sender address”) to the workflow inputs of your choice.
Save your mapping.
Once mapping is complete, every time that event occurs, it will trigger the app workflow using the mapped data.
Viewing and Managing App Schedules

You can manage all your scheduled apps from the App Schedules page.
To access it: click the App Schedules button at the top of your App List page.
Schedules appear in the order they were created (oldest at the top).
From here, you can:
Re-schedule: adjust the timing or frequency.
Delete: remove a schedule.
What Happens After an App Runs
One-time schedules are automatically removed from the list once they’ve successfully run.
Recurring schedules (daily, weekly, monthly, yearly) remain on the list until you delete or reschedule them.
Event-based schedules remain active until you delete them.
Example Use Cases
Time-based schedules:
Daily: Send a summary email every morning.
Weekly: Run a report every Monday.
Monthly: Generate invoices on the last day of each month.
Yearly: Send a customer appreciation message every January 1st.
Event triggers:
Gmail: Run a workflow every time a new email arrives.
Slack: Trigger an app when a new message posts in a channel.
Calendar: Start a workflow automatically when a new event is added.
FAQs
Q: Can I edit the input values later?
A: No, the inputs you set when scheduling will be reused each time. To change them, you’ll need to delete the schedule and create a new one.
Q: What if I’m in a different time zone when traveling?
A: Your schedules follow the time zone of the device from which you access PromptForm.
Q: Why don’t I see the Event Trigger option?
A: Event triggers require access to connected tools. If you don’t see this option, check whether tool connections are enabled for your account. If not, please reach out to your administrator.